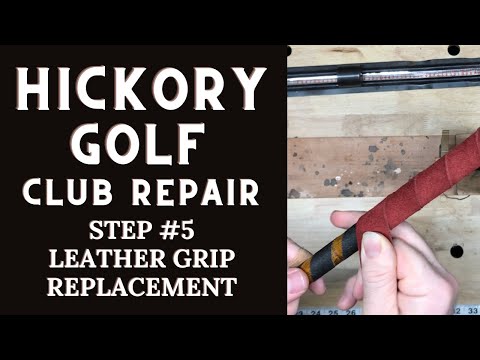
Step 5: Leather Grip Replacement
Once the clubhead has been reset and re-pinned, you can install a new leather grip if necessary.

One of the most satisfying DIY repairs on a hickory golf club is replacing the leather grip. It’s an easy and effective way to make a hickory club playable again.
In this “Hickory Hack,” I share my method for cutting new leather grips, taking swing weight into account with a new grip, and wrapping the grip. (scroll to the bottom of this post for the video).
*** *** ***
When you’re just starting out with hickory golf, you’ll probably want to buy pre-cut leather grips. I like the high-quality offerings at Hickory Golf Workshop in Vermont, where you can find a variety of colors and leather to dial-in the right feel.
But if you’re into DIY and want to stretch your dollar, you might want to try buying bulk leather and cutting your own grips. Generally speaking, you’ll want to look for sides of leather that are 3-4 ounces in thickness in deertan cowhide or premium suede (this handy gauge and conversion chart can help you with verifying thickness). I find both types of leather at Tandy Leather and usually wait for clearance events or holiday sales to make my purchases.
Personally, I prefer deertan cowhide because of its water resistance. It also gives you the option of using the smoother pebble-grain side or the rougher suede side. It all comes down to a matter of preference, but as Harry Vardon discovered around the turn of the century, the grip of the rough side out in all weather conditions is hard to beat. If rough side out was good enough for Harry, it’s good enough for me.
As for the premium suede, you’ll be hard-pressed to find a more economical bulk leather buy. While you won’t get the same water-resistance as you do with deertan cowhide unless you spray it with a treatment, the upside to suede is that you can make lighter grips with it. If you’re looking to maintain a particular swing weight and don’t want to throw it off with a bulkier grip, a single wrap of suede will do the trick. Suede is also my grip of choice for my pre-1900 gutty clubs because it looks more period authentic.
*** *** ***
The key to cutting your own grips is making sure you have a stable, straight edge to cut against and a very sharp razor or rotary cutter to ensure a clean cut in one pass. I’ve used both and highly recommend the Fiskars titanium rotary cutter – you’ll avoid the slips and ragged edges that can happen with an unsteady hand and a razor.
As you’ll discover when you start wrapping the grip, a straight cut along the length of the grip is paramount. A consistently straight cut will allow you to wrap the grip seam-to-seam without overlap to cover up gaps or inconsistencies. Some players like those overlaps because it creates a ribbing effect, but I prefer to keep the seams as flush and smooth to the shaft as possible.
Length is also a matter of preference, but I’ve found 35 inches to be ideal. Usually, you’ll end up with a few inches extra after wrapping, but I’d rather that than come up short when replacing an exceptionally long original grip.
Direction and width of your cut is also worth noting. If you’re working with a side of leather, you’ll get the most bang for your buck if you cut longways from the spine to the belly. The leather along this length and orientation will likely vary with the thickness being greatest toward the belly. That’s OK, though, because in order for the grip to wrap nicely, you’ll want to cut the grip with a taper. I like mine to taper from 1-1/4” wide at the butt end (the leather near the spine) down to 1” width at the top end (the leather near the belly). This way, if you’re grip is too long, you’ll be cutting from the thicker end of the grip which will help you keep swing weight in check if that’s a concern.
*** *** ***
Just like with modern clubs, changing the grip can affect swing weight on a hickory-shafted golf club. Simply put, swing weight is the perceived weight of the clubhead during the swing and is modified by changing the balance point of the club. When you start buying hickory golf clubs at antique stores and flea markets, you’re going to find plenty of clubs that might feel too light; that can be rectified to a degree with a different shaft and/or a different grip.
Some players like to feel the clubhead more in their swing and will prefer a higher swing weight; others like to feel it less to encourage a quicker swing. I find a heavier swing weight helps me maintain an even tempo through my swing and prevents me from overswinging – detrimental with hickory golf clubs. Try out different swing weights and see what works best; whatever helps you consistently find the sweet spot is the ideal swing weight for you.
When you’ve determined your ideal swing weight, understand that adding 4 grams of weight to the butt end of the club will result in 1 swing point loss. I like to weigh the grip then check the swing weight of the club before wrapping the grip so that I can estimate how many swing points I’ll lose with a particular grip. Usually, a 35-inch grip of deertan cowhide will weigh 20-24 grams. That doesn’t necessarily mean you’ll be losing 5 to 6 swing points, though, because the length of the grip will distribute the total weight of the grip from the butt end to just about the middle of the shaft. I normally only lose 2 to 3 swing points or sometimes none at all if the grip I’m replacing weighs about the same as the replacement.
Be aware, too, that the amount of underlisting you use beneath the grip – whether it be hockey (friction) tape, felt, or both – will also affect the swing weight. I’m a stickler for swing weight so I limit my underlisting to 1-1/2 strips of friction tape so I can better control the amount of weight I’m adding to the grip area. If you’re working with a heavier clubhead and higher swing weight than you prefer, adding more underlisting is a good way to bulk up the grip and lower the swing weight.
*** *** ***
Your first grips will probably turn out a little ragged looking – mine certainly did. But the more you practice – both your cuts and your wrapping – the better they’ll look. It’s easier to show than tell, though, so on to the video: